Here are three extracts from our final film that are about ten seconds long. The first one is of only the shots with none of the main effects we use like the overlapping. The second one is the same extract with tiles and effects. The third clip is the final product with the titles effects and sound. This is a way to show how we have progressed from simply placing the shots on the time line and how we have used various techniques in FCP like the effects and titles.
Friday 8 April 2011
Q8: Looking back at your preliminary task, what do you feel you have learned in the progression from it to the full product?

From my preliminary task to my final film has been a long process where i have learnt and improved a number of skills when filming and editing my film Foursquare.
Pre Production.
When filming our preliminary task we created a jelly baby animatic of the type of shots we were using. We found the animatic quite hard to create and our editing skills were not as good as they are now. We couldn't put the jelly babies in the exact spots that we wanted to so we lost accuracy and meaning of our shots. However, when creating a storyboard of our Thriller Foursquare, we used a variety of shots and our animatic was smooth and fit well together. We thought carefully about the type of shots we were using and made sure we had a wide range of shots included in our storyboard so it was clear when we would start filming. Being able to draw the shots directly meant that it would become more visual and we could draw our shots exactly how we wanted. We used sites like Art of the Title Sequence and YouTube clips of Thrillers for some influence and inspiration. The storyboard and animatic are very important in the process of filming to we made sure it was of a high quality as it is the guide lines we were following when filming our thriller.Production.

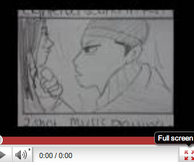
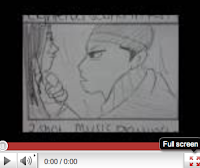
When producing our Preliminary film it was all quite rushed and unorganised. We didn't have our story board with us and we didn't think properly about the mise en scene of our clip. Here in this clip is a screen grab of the opening of our preliminary. The titles are bright red and look unprofessional as there are three full stops after them. We used very basic editing in this shot. The camera angle is quite tilted and the mise en scene of the window is limited and wasn't effective.

We didn't fully understand how to position our camera on the tripod properly so the shot looks unprofessional and messy. However in our thriller film we learned a number number of skills that would help us creating better footage. First of all our shot is filmed in focus and we really thought about the mise en scene and purpose of this shot. This is an establishing shot and we chose to shoot it on the roof so we would have a wider range of footage and a shot that really sets the scene. During editing we were also able to add an effect on this shot, whereby the building are smudged and a little blurred which builds tension and suspense. This is also a point of view shot so we know that we are looking out of the eyes of a character, and positioning them about represents their status and authority in the film just by the opening shot.

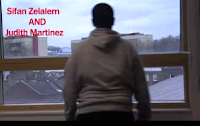
 In this shot of Sifan, the camera is slightly out of focus. This is from our preliminary film, The Wait. There are no effects on the shot and like the other one the mise en scene is limited and it wasn't effective. We tried to set the scene however we didn't think about it properly as he is by a window and it is unclear where the character is located. Also, we didn't think about costume at all, so his casual clothes do not represent very much or say anything about the character. However, in this screen grab of from our Thriller we have used effects on Final Cut Pro to merge two images together to create suspense and build tension. We learned this editing skill and applied it to our Thriller because it makes the footage more interesting and intense. Also, our shots are very well done. We have the character looking our into the scenery from the top of the roof from two different views, which shows our variety of shots. We made sure we shot the same thing from several different angles to create variety and speed up and footage to not make it boring. Also we thought about the costume and body language of our character, He is dressed in all back to represent he is the Protagonist and main character of the film. This also represents he is dominant and not a pleasant characters because black has negative connotations. He is standing still and confident which shows he is in control of the action. There were all skills we learnt to represent on camera through the progression of our filming process.

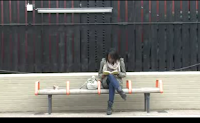
This shot from our preliminary film is meant to be a two shot. the shot slightly titled and the lighting is too harsh. Also the ND Filter is on so the shot came out much too bright whereby some objects weren't visible and it doesn't look good on the big screen. Also, the characters cant be seen very well and it is shot from a high angle, signifying that they are vulnerable. when they are not. We learned how the angle of a shot can change the way a character is meant to be represented therefore this two shot should have been from a level angle, signifying the characters are of an equal status. The four split shot of our characters is used to represent all the girls equally going on their daily routine. This was a skill we learnt, whereby we edited the footage one on top of the other and changed the size of each clip, making the effect of the action happening simultaneously. We thought about the mise en scene in great detail here, each girl is located in a different space, train station, house, restaurant and a park. We wanted to create great variety and show that there girls live very different lives. The music at this part was orchestral and suspenseful, which we edited using Soundtrack Pro, we wanted it to match the Psychological themes of our thriller. Also we thought about props in this shot, like the mascara is an essential item that represents femininity which is the effect we were trying to give off. Showing these girls simultaneously shows they are all the protagonists and victims of the main character who we shot earlier.

Teamwork!
Working closely with my group enabled us to build on our team work skills. Working together to produce an effective film is all about listening to each other, understanding each other and being able to trust each other. We learned to organise ourselves properly, so everyday when filming we would make a list of the props we needed, keep a production schedule on us and to ensure we had our story board and that the characters (us) are dressed accordingly. We also had to make a few phone calls to secure our locations and find a decent meeting time where we would all be available to work. We also had lots of fun making our film, we had to rely on one another to make sure we were all individually prepared for filming and that we would all put in effort and time to work together. We also had to make sure we listened well inc lass to learn new skills and apply them to our thriller. Working as a team meant that we would trust each other with the equipment and put all our ideas into editing and filming Foursquare. We made sure we met up often and did things together so that everyone would have equal input and that we would all do well in the subject. I thoroughly enjoyed working with my group and I feel that putting all our ideas together and building a friendship really did help us to get along and make a good thriller opening.
Thursday 7 April 2011
EVALUATION Q 8 Looking back at you preliminary task, what do you feel you have learned in the progression from it to the full product?
In this clip I look back at how we have improved from our Preliminary film to our final thriller opening.
EVALUATION Q 7 Different Technologies
During the process of making the thriller opening we used various different kinds of technologies like the internet, equipment, and software. This is a time line of the technologies we used and what we used together.
We of course started off with Blogger which was where we produced all our work and published our film.

Here we did all sorts of things like embedding clips from Youtube which we often used with blogger.

We often had to find images on google for research so we used google image sin conjunction with blogger.

When we finally started filming we used JCV video cameras to record all our footage and still cameras to capture the making of the films.


Then when we came to editing we where introduced to Final Cut Pro. We also used other programs like Soundtracl pro and Live type along side FCP to produce our final products.


Also when we came to actually filming our final final we had to use phones to keep in touch with each other and organise meeting times and locations.

EVALUATION Q 6 Audience Feedback
After looking back at the comments we received from the cinema screenings, I made a quick collage of what they thought. Even though they are not our target audience, we will still take their comments into consideration because we wanted to see what other people, who this film wasn't specifically aimed at, would say.

EVALUATION - Q8: What we've learned

Filming: these two shots are a good example of the progress we have made from the prelim and the final film, we have made a great change in the way we film. We had a tilted camera at the start and also the lighting was way too bright for the type of shot we were trying to create but now on the first screenshot we have shown a lot of improvement for example the shot is steady and looks professional compared to the second one.

Editing: our editing skills have improved a lot too in the time from then to now, I used to only be able to use one program but now I can use all three programs properly and can make them work together on final cut pro. We did a lot of editing in class, in the first prelim we barely had any transitions now on this film (screenshot above) we used an overlap which shows our progress from having no transitions or effects to using a wide range of editing skills such as laps.


Q8: PRELIM TO FINAL FILM
The prelim was an excellent task, I remembered significant mistakes that were made throughout the entire prelim process:

 Also during planning the final thriller I researched online for a gap in the thriller market which therefore helped us to decide our thriller genre. By searching for other thrillers on YOUTUBE and ART OF THE TITLE I could use aspects of intertextuality in the final piece.
 During our prelim we rushed our production stage, we filmed during one lesson inside college- this was not a particularly exciting location. During our real thriller we experimented with a number of locations, because we had planned these locations when it came to filming we knew where we were going. We also took more time filming, we did not rush and we also took extra shots to be 100% sure we had the shot.
 Our prelim was very light- as the picture shows, we did not correctly set the lighting and we used manual focus throughout. However, during our thriller filming we decided to use auto focus and we also double checked the lighting. You can also see on our prelim that we only used basic shots, the camera was accidentally tilted and this was clear to see, when filming our real thriller we used a wide range of shots and even angles to build tension, this came simply because we had planned them, we also watched a few shots back to make sure the camera was not tilted. We worked on mise en scene to build suspense whereas in our prelim we had jelly baby packets in the background! so this time we also looked at mise en scene.

 We used soundtrack in our prelim and we also experimented with Livetype, however we wanted to keep our titles in our final film simple, we began to produce Livetype titles but we were told we could produce the same effect for quicker on final cut. We used a soundtrack in our film that we got from another source- however we did gain permission and edited this sound to create our desired effect.

The prelims taught me a lot about planning, filming, mise en scene, props, editing, text and effects. I believe it was highly useful to create a piece without not being 100% sure what you are doing. Because when it came to the final film I could learn from my mistakes and apply that to a successful final film.

PRE PRODUCTION:
Planning the prelim we used Jelly Babies to produce a story board animatic, this didn't give us a clear idea of shots because we couldn't fix the jelly babies into the positions we needed. This was the only planning we did, for the prelim we didn't see the urgency to plan.
When it came to our real thriller I realized how crucial planning was, as the Jelly Baby animatic was not successful for us we decided to produce a very detailed story board entailing both costume and mise en scene.
 Also during planning the final thriller I researched online for a gap in the thriller market which therefore helped us to decide our thriller genre. By searching for other thrillers on YOUTUBE and ART OF THE TITLE I could use aspects of intertextuality in the final piece.
 Another crucial planning decision was a timetable, this time we produced a filming timetable so we knew exactly what we were filming and when. We also took stills of desired locations so we could compare them and decide where to film
PRODUCTION:
 During our prelim we rushed our production stage, we filmed during one lesson inside college- this was not a particularly exciting location. During our real thriller we experimented with a number of locations, because we had planned these locations when it came to filming we knew where we were going. We also took more time filming, we did not rush and we also took extra shots to be 100% sure we had the shot.
  Our prelim was very light- as the picture shows, we did not correctly set the lighting and we used manual focus throughout. However, during our thriller filming we decided to use auto focus and we also double checked the lighting. You can also see on our prelim that we only used basic shots, the camera was accidentally tilted and this was clear to see, when filming our real thriller we used a wide range of shots and even angles to build tension, this came simply because we had planned them, we also watched a few shots back to make sure the camera was not tilted. We worked on mise en scene to build suspense whereas in our prelim we had jelly baby packets in the background! so this time we also looked at mise en scene.
POST PRODUCTION:

During editing, final cut pro was used for both the prelim and the final film, when editing the prelim we were rushed for time so we didn't use final cut pro to the best of both our ability and final cut pro's ability. In our prelim the edits were basic, and we did not use any effects apart from a cross dissolve to start with and to finish with. During our final film we used mass amounts of effects from the split screens to the overlay of clips, we had more experience with Final Cut meaning we were able to experiment with ideas to create tension.

 We used soundtrack in our prelim and we also experimented with Livetype, however we wanted to keep our titles in our final film simple, we began to produce Livetype titles but we were told we could produce the same effect for quicker on final cut. We used a soundtrack in our film that we got from another source- however we did gain permission and edited this sound to create our desired effect.
 The editing for our final film took a lot more time, we spent ages on getting each clip perfect. We also went into depth at looking at effects and what sort of thing would look tacky, for example we used red font in producing our prelim we later thought this looked very tacky so we opted for black during our final film.

The prelims taught me a lot about planning, filming, mise en scene, props, editing, text and effects. I believe it was highly useful to create a piece without not being 100% sure what you are doing. Because when it came to the final film I could learn from my mistakes and apply that to a successful final film.
Subscribe to:
Posts (Atom)